Teydex React Native Documentation
Overview
This documentation provides all necessary implementation details, usage examples, and platform-specific instructions for integrating the Teydex React Native library into your iOS and Android projects in a secure and robust manner.
Requirements
To ensure seamless integration and stable operation, your project must meet the following minimum requirements:
| Platform | Minimum Version / Requirement |
|---|---|
| React Native | 0.71.0 |
| Android | minSdkVersion: 24 |
| compileSdkVersion: 34 | |
| targetSdkVersion: 34 | |
| kotlinVersion: 1.8.0 | |
| Gradle Plugin: 7.4.2 | |
| Gradle: 7.6 | |
| iOS | iOS 13.0 |
| Xcode 16.4 (required for building) |
Note:
Operation on versions lower than these is not guaranteed. For iOS, Xcode 16.4 or higher is strictly required to build.
Additional Android Requirements
1. Android Gradle Plugin and Kotlin Version
Ensure the following in your android/build.gradle:
buildscript {
    dependencies {
        classpath("com.android.tools.build:gradle:7.4.2")
        classpath("org.jetbrains.kotlin:kotlin-gradle-plugin:1.8.0")
    }
}
And in your gradle/wrapper/gradle-wrapper.properties:
distributionUrl=https\://services.gradle.org/distributions/gradle-7.6-all.zip
Installation�
npm install kyc-react-native@0.1.0
# or
yarn add kyc-react-native@0.1.0
Android Integration
1. AndroidManifest.xml Configuration
Add the following attributes to your AndroidManifest.xml:
<manifest ...
 xmlns:tools="http://schemas.android.com/tools">
 <application ...
 tools:replace="android:icon,android:roundIcon,android:label,android:allowBackup,android:name,android:theme">
2. Adding Dependencies
Add the following to the dependencies block of android/app/build.gradle
dependencies {
    implementation "com.innovance:kyc:1.0.0-rc14-hayhay"
}
2. Configure Maven Repository Access
To enable remote (online) downloading of the library, make sure the following repository definitions are correctly included in your android/build.gradle file.
In particular, you must provide the required authentication credentials accurately for repository access.
allprojects {
    repositories {
        maven {
            allowInsecureProtocol = true
            name = "GitLab"
            url = uri("<REPO_URL>")
            credentials(HttpHeaderCredentials) {
                name = "Private-Token"
                value = "<PRIVATE_TOKEN>"
            }
            authentication {
                header(HttpHeaderAuthentication)
            }
        }
    }
}
- Replace REPO_URL with the repository URL provided to you.
- Replace PRIVATE_TOKEN with your personal access token supplied by your organization.
- The
allowInsecureProtocol = truesetting should only be used on secure networks or trusted internal servers.
iOS Integration
USAGE
processKYC
Parameters
| Parameter | Type | Required | Description |
|---|---|---|---|
| clientToken | string | null | true | Client token required for the KYC process. |
| applicationId | string | null | true | Unique identifier for the application. |
| stepList | StepItem[] | true | List of steps to be followed in the KYC process. |
| baseUrl | string | true | Base URL for API requests. |
This method is used to initiate and manage the user's KYC (Know Your Customer) verification process step by step.
It starts the process using the specified step list and parameters, and manages the flow accordingly.
StepItem Type
A StepItem defines each KYC step and its associated texts/options. The following step types are supported:
- KYCStep.ID_CARD_FRONT
- KYCStep.ID_CARD_BACK
- KYCStep.HOLOGRAM
- KYCStep.NFC
- KYCStep.LIVENESS
Each step can include the following parameters (those marked as optional are not required):
| Property | Type | Required | Description |
|---|---|---|---|
| stepType | KYCStep enum | true | The type of KYC step |
| infoTitle | string | false | Information title |
| screenTitle | string | false | Screen title |
| descriptionText | string | false | Description text |
| buttonText | string | false | Button text |
| bullets | string[] | false | Bullet point descriptions |
| identifyTimeout | number | false | Step timeout in milliseconds |
| imageName | string | false | Name of the custom image file |
| lottieFileName | string | false | Name of the custom Lottie animation file |
Example Usage
import { processKYC, KYCStep } from 'teydex-kyc';

const stepList = [
  { stepType: KYCStep.ID_CARD_FRONT, screenTitle: "Scan the Front Side of Your ID" },
  { stepType: KYCStep.LIVENESS, screenTitle: "Liveness Check", descriptionText: "Please look at the camera." },
];

processKYC({
  clientToken: "abc123token",
  applicationId: "myAppId",
  stepList,
  baseUrl: "https://api.example.com",
});
Event Emitter Usage
The Teydex React Native library provides an EventEmitter interface that allows you to listen to events triggered during the KYC process.
This structure enables you to easily handle successful actions, errors, or intermediate states as they occur. Each event is dispatched with its own event name and a specific payload.
Event Parameters and Payload Types
Below are the supported event names and the payload types delivered with each event:
| Event Name | Description | Payload Type | Payload Fields |
|---|---|---|---|
KYC_Event | Triggered at any stage of the KYC process | KycEventPayload | type, eventName, eventDetail? |
KYC_Error | Triggered when an error occurs during KYC | KycErrorPayload | type, eventName, errorMessage? |
KYC_Completion | Triggered when the KYC process is completed | KycCompletionPayload | type, eventName, result? |
Payload Fields:
| Field | Type | Required | Description |
|---|---|---|---|
| type | 'event', 'error', 'completion' | true | The general category of the event |
| eventName | 'KYC_Event', 'KYC_Error', 'KYC_Completion' | true | The name of the event |
| eventDetail | string | false | (Only for KYC_Event) Additional detail |
| errorMessage | string | false | (Only for KYC_Error) Error message |
| result | boolean | false | (Only for KYC_Completion) Result |
Example Usage
import { TeydexEventEmitter } from 'kyc-react-native';

// Listen for any KYC event
const kycEventListener = TeydexEventEmitter.addListener(
  'KYC_Event',
  (payload) => {
    console.log('KYC Event:', payload);
    // You can access additional details via payload.eventDetail
  }
);

// Listen for error events
const kycErrorListener = TeydexEventEmitter.addListener(
  'KYC_Error',
  (payload) => {
    console.error('KYC Error:', payload.errorMessage);
  }
);

// Listen for KYC completion
const kycCompletionListener = TeydexEventEmitter.addListener(
  'KYC_Completion',
  (payload) => {
    if (payload.result) {
      console.log('KYC completed successfully.');
    } else {
      console.warn('KYC was not successful.');
    }
  }
);

// Always remove listeners on component unmount or during cleanup
kycEventListener.remove();
kycErrorListener.remove();
kycCompletionListener.remove();
Adding Custom Images and Lottie Animations to Steps
You can add a custom image (imageName) or a Lottie animation (lottieFileName) to a step via the library.
To do this, simply provide the relevant parameter when defining the step.
Note: For each step, you must use only one of
imageNameorlottieFileName. Using both at the same time will cause an error in your application. Use only one option per step.
General Usage
const stepList = [
  {
    stepType: KYCStep.ID_CARD_FRONT,
    imageName: "id_front.png"
  },
  // ... other steps
];
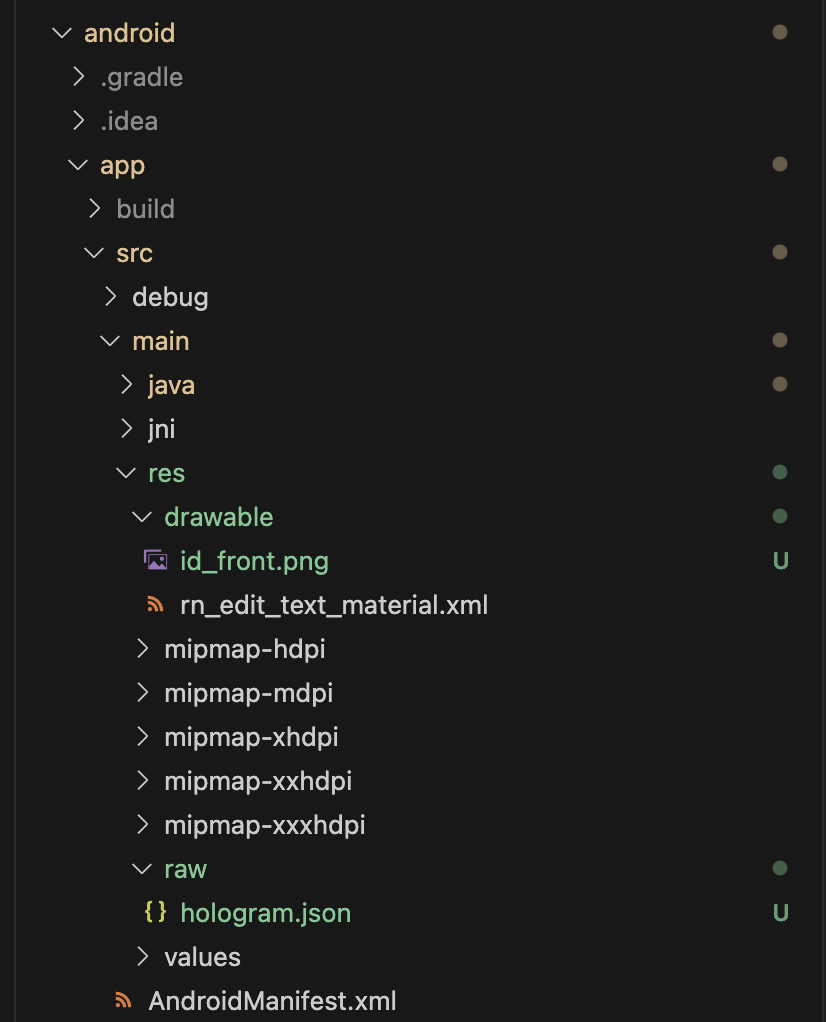
Adding Images and Lottie Files on Android
-
Adding an Image:
- Place your image file in the
android/app/src/main/res/drawabledirectory. - Example:
android/app/src/main/res/drawable/id_front.png
- Place your image file in the
-
Adding a Lottie File::
- Place your .json Lottie file in the
android/app/src/main/res/rawdirectory - Example:
android/app/src/main/res/raw/hologram.json
- Place your .json Lottie file in the
Sample Android folder structure:
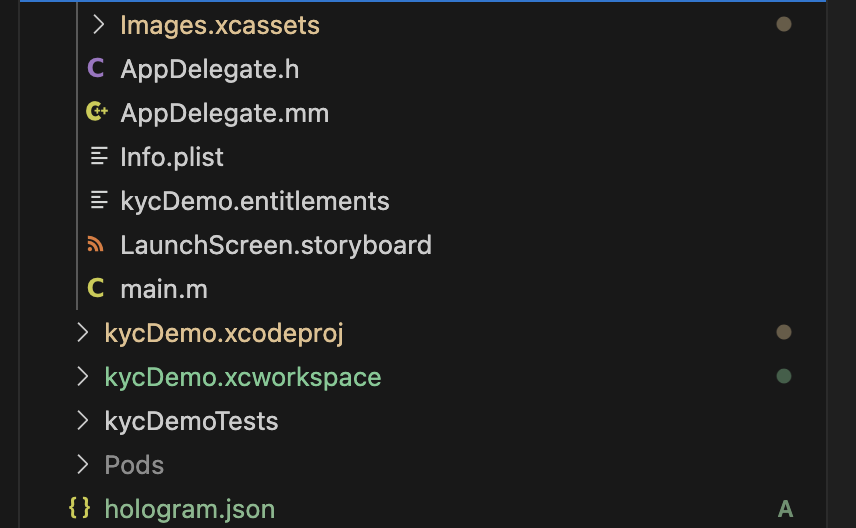
Adding Images and Lottie Files on iOS
-
Adding an Image:
- Add your image file to the
Images.xcassetsdirectory of your Xcode project. - Example file name:
id_front.png - Add your image file to the
-
Adding a Lottie File:
- Add your
.jsonLottie file to your project via Xcode (either in the main directory or a folder). - After adding, make sure the file is included in the correct (Target Membership).
- Add your
Sample iOS folder structure:
Expo Integration Guide
This section provides a step-by-step explanation of how to integrate the Teydex KYC React Native library into an Expo project.
Note:
Due to native module requirements, the Teydex KYC SDK cannot be used directly with the Expo Managed Workflow. A minimum of Expo SDK 48 or higher is required for setup. If your project does not yet containandroid/andios/folders, follow the steps below to generate them.
1. Generating Native Folders in Your Expo Project
npx expo prebuild
Additional Expo Configuration & New Architecture Support
Note:
If you intend to use React Native New Architecture (TurboModules/Fabric) in your Expo project,
theNativeKycReactNativeSpecfile must be generated via codegen.
However, codegen for this file is not automatically supported in Expo projects at this time.
Therefore, developers who wish to use the new architecture (TurboModules/Fabric) must
manually add and configure the NativeKycReactNativeSpec file in their projects.
Summary:
- If you enable New Architecture, you must manually include the required codegen files.
- If you are using the standard (legacy) architecture, no additional steps are necessary.
For more details and step-by-step instructions, please refer to the React Native Codegen Documentation and official Expo docs.
Required Configuration
After installing the KYC package, you need to add the following plugin entry to your project's root app.json or app.config.ts file:
For app.json:
{
  "expo": {
    // ...
    "plugins": [
      ["kyc-react-native"]
    ]
  }
}
For app.config.ts
module.exports = ({ config }: { config: ExpoConfig }) => {
  ... rest of your app config
  plugins: [
      ["kyc-react-native"],
    ],
};
Updating Native Files
After completing the above configurations, you need to run the following command to ensure that all changes are fully applied to your native (Android/iOS) projects:
npx expo prebuild --clean